POSTS
How I write papers (Part 2)
by Luis P. Prieto, - 15 minutes read - 3178 wordsWriting a paper is one of the hardest, but most creative parts of a Ph.D. Very often, we do not know where to start, what to do at what point, or when to get feedback from our collaborators. In a previous post, I started describing in detail the process I normally follow to write my scientific papers. This post explains the rest of the process, from the outlining until you send your manuscript off to the journal/conference. One would think that this is straightforward, just scribbling and scribbling, right?
For those of you that did not read the previous post, I strongly recommend you go read it before reading the rest of this one. For you, and for the rest of us who just have bad memory, here is what the overall process looked like, including not only what to do in each step, but also when to get feedback from others:
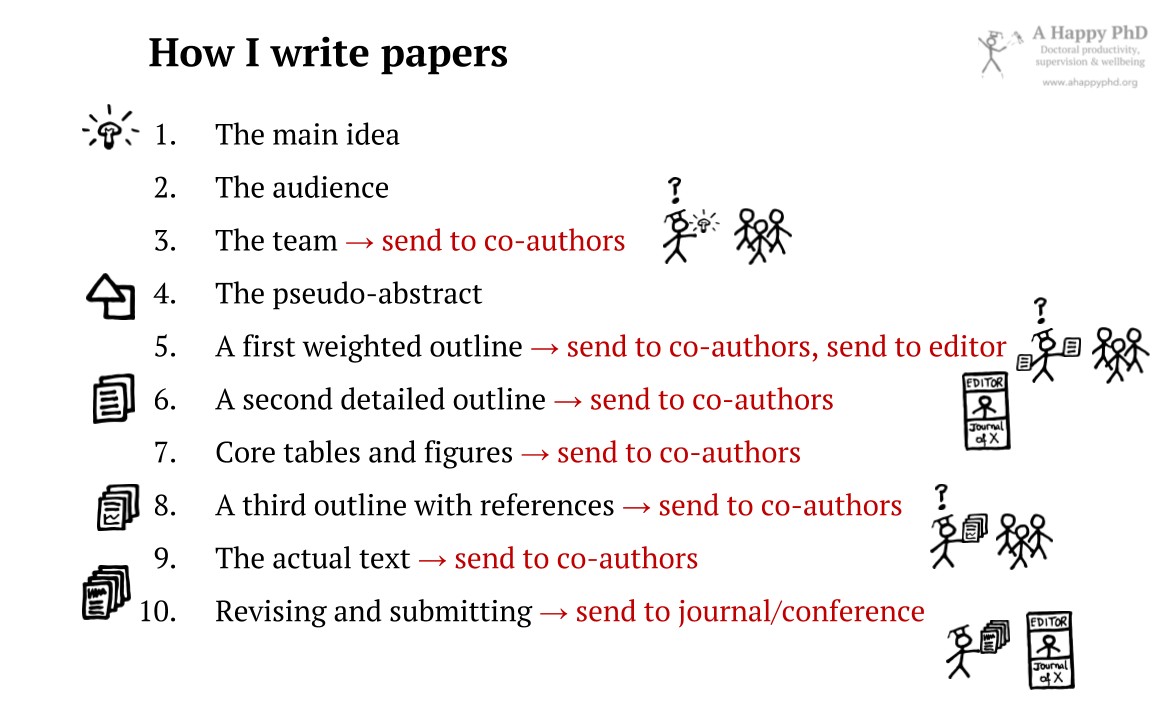
In steps 1–5, we came up with a central idea for our paper (i.e., the contribution, the reusable knowledge that we think other researchers will be interested in). Then, we decided who our audience is (i.e., what specific community, what journal/conference would be interested), and who would be a good set of co-authors to write it with. Afterwards, we created a pseudo-abstract that summarized what is known about the paper’s topic, and what the paper brings to the scientific community and society at large. Finally, we created a “weighted outline” (a table of contents with assigned lengths for each section). You also got feedback from your co-authors a couple of times along the way, and maybe you even got the editor of the journal to signal if the paper idea would be appropriate for the journal. Now, let’s move on…
Step 6. A second, detailed outline
This is just the classic, run-of-the-mill, outlining technique that many of us have been taught since high school: For every section and subsection in your weighted outline (step #5), write a series of bullet points which summarize the main points of each of your expected paragraphs. While everybody seems to know how to do this, step #6 is probably the most difficult to get right, and the one in which most writers get derailed, in my experience. Classic problems include: a) putting just a keyword in the bullet (they should be full sentences, with subject, verb, object1); or b) making the bullets multi-line paragraphs (they should be a summary, not the actual text – the whole point is to compress the information that will be there once you write the text); or c) making the bullet a vague placeholder (e.g., “lessons learned from experiment” looks like something you will say over several paragraphs… OK, what were the lessons? can we get the headlines, or an example?). As a general rule of thumb, your detailed outline should not be more than 20-25% of the expected length of the section/paper (i.e., if it is 5%, maybe it does not have enough detail!).
When this detailed outline is finished, it is quite possible that you will have open questions, parts that you do not like at all, and your own ideas of the paper may have developed a lot by doing this exercise of putting concrete words on paper. This may be a good moment to check in again with your co-authors. You may feel this is too frequent feedback, but think that you are just sending, say, a 4-5 page document, not the full 20-page journal paper. This has two advantages: a) it is quicker to read and understand, and thus easier to fit in their busy schedules; and b) it focuses the feedback on the big ideas, the general structure (not in tiny grammar and formal details that may not be relevant anyway if the structure is modified). If things go well, you will probably get quite a bit of feedback and some useful discussions, and maybe even some changes about the overall approach of the paper. At this point, changes of direction (even large ones) are still OK – remember that it does not entail ditching entire pages of hard-earned text, only a few bullet points here and there!
- You can find the detailed outline for my example paper here. You can see that my bullet points tend to be a bit complex and convoluted, almost looking like draft text. So yes, I don’t follow my own method literally, always. The really important thing here is that you are able to write it more-or-less quickly, and that it summarizes clearly (but concisely) the logical flow of ideas in the text, so that you can get quick feedback about it from your co-authors.
Step 7. Add core tables and figures
This step is quite common advice when writing scientific papers. When writing the paper, do not start from the beginning till the end; rather, start from the core, the center, the results of your study. To synthesize the results, very often we resort to figures, charts, graphs, and/or tables. Sometimes, you also have some of those in the methodology, to explain the flow of events in your study, or the experiment protocol, the analysis workflow, whatever. These are very important parts of your paper, to the point that a reviewer in haste will probably just read the introduction (to get an idea of what the paper is about) and then glance through your tables and figures (to understand your main results in a bit more detail than what the abstract says)2. Hence, try to think what tables and figures your results require: what things would be too long to say in text, but would be quite clear and quick in a table or a graph? Quantitative data is an obvious choice, but also qualitative or mixed methods research can benefit from well-designed tables and figures, or photos. Add those tables and figures within your outline, wherever you think they fit within the flow of ideas. Then, if you can get your co-authors to look at them and give feedback, that would be great as well. Very often getting the figures right takes several iterations, as different sets of eyes interpret things differently, or need different amounts of labeling and clarification to understand your data or the point you try to convey.
Step 8. A third outline with references
After so many passes at the paper outlines, and four rounds of feedback with your co-authors, the ideas should be quite settled now. However, I like to insert one step more before drafting text: just add all the references needed by your paper. Probably you have been collecting and having ideas in mind about related work you could cite, and your co-authors probably have suggested some more research literature worth citing. The idea now is to be more systematic: go over each bullet point in your detailed outline, and think what references can support your ideas (or counter them!). You may find that you need to go and search some more papers about certain topics you don’t know enough about. That’s OK, take some time and search until you find what you need (or leave some placeholder like “ref needed”, if you want further input from your co-authors). Once you find the right references, add them to the relevant bullet points, using your favorite reference manager3. Once you have gone through the whole outline, you can generate the references section in seconds (that’s why you want the reference manager), and see whether your prediction for the length of the references was accurate. If not, you may need to add some, or remove non-critical references.
As usual, you can also send this detailed outline with references and figures to your co-authors. This version has all the elements to understand a paper and much of its quality, without the distraction of long stretches of text. Your co-authors can thus give you some ideas for references, and they can still provide feedback on the overall flow of ideas, if needed.
- You can find the detailed outline with figures and references from my example paper here. As you can see, this is already something like a paper, but without the burden of too much text. You can also notice that it is about 3,600 words long. Taking into account that our target journal’s maximum length was 6,000, by now it became clear that we probably would not be able to fit this paper into that journal’s requirements. Since we really thought that this (i.e., the sequence of ideas in the outline) was the best way to tell this contribution, at this point we started looking at alternative venues which had a similar audience and quality, but less restrictive format.
Step 9. Draft the actual text
By now you have gone through the sequence of ideas with your co-authors so many times (about five?), that the message and how to communicate it should be quite clear. In fact, you probably had to repress the impulse to start drafting text already. For me, that is the great advantage of this approach to writing papers: instead of struggling with the blank page and with drafting the text, by the time you reach step #9, half of the paper is already written in your mind, and you are actually glad you are “finally writing”. Another advantage is that this step of drafting text is (at least for me) so much faster! Depending on the length and complexity of the paper, once all the other pieces are in place, writing the text will take me only about 2-3 full days of work – much shorter (and much more enjoyable) than it would have been if I had been drafting (and re-drafting based on co-author feedback) all along. When I reach this point, I also make sure that I am using the author guidelines and templates of the target journal/conference4.
Once you have completed this first draft of real text, you can put it in the drawer for a couple of days, and take it out of your head. Then, you can come back and read it again (you will probably see typos or things that are not understandable, or that you don’t like) and edit your text a bit. Then, it is good to send it once again to your co-authors for feedback. By now the discussions about structure, main message and so on should be over, and feedback will probably be more fine-grained, maybe about style, missing or superfluous details, etc.
Step 10. Revise, generate final draft and submit!
Once you got the feedback from your co-authors, you can edit again the text to consider that feedback. If everyone is happy with the state of the paper, now it’s time to submit! Re-check (if you did not do so in previous steps) that you are following the author guidelines and templates of the journal or conference… and submit the paper to your target venue using the corresponding submission system.
- You can see a preprint of our example paper, with the version that we first submitted to a journal, here. As mentioned in the previous post, the story of the paper still goes on, as this first journal rejected the paper (even if reviewers remarked only minor weak points). Since no big amendments had been made to the core contribution of the paper, after a few enhancements we submitted it to a second journal. The reviewers of the second journal also have proposed a few revisions to it, which have led to the revised version that is again under review.
That’s it.
This 10-step process may seem long (mostly because I was not able to shorten more my narration of it), but it is surprisingly efficient. If you ever have tried to draft a paper in a more unstructured way, and gotten a group of engaged co-authors to give you substantial feedback, you will realize how much shorter, time-wise, this 10-step process is (e.g., my first journal paper took some nine months to be written, using a much more chaotic process). To give you a rough estimation, this kind of process makes you spend about 70% of the time planning the paper, 10% drafting actual text, and 20% revising the text with your co-authors. While this heavy emphasis on planning seems odd at first, it is among the best practices recommended by many scientific writing courses5. And there is also some evidence from studies that suggest that students that plan so much at the outset feel more productive and find writing less difficult6!
Caveats and other disclaimers
As I mentioned at the outset of the previous post, this is just my process. It is not the only, or the best process in absolute terms (because there is no such a thing as the perfect process that works in every situation). For some people, starting with the “big idea in a sentence” may seem impossible. The ideas may not be so clear yet, you feel like you have 37 different things to say about the topic. For those people, sometimes it is recommended to do a bit of “free writing” first7, which I incorporate into my method as:
Step 0. Write some text for yourself / Write an internal research report. If you do not know exactly what the main message is, and you don’t even feel comfortable generating a few options (see step #1), you can just try to write something. Anything. For 5-10 minutes, write for yourself whatever comes to mind that the paper could be remotely about. You will not show this to others. Don’t bother finding the exact right word if it does not come to mind. Go on and write until your fountain of ideas runs dry.
Another way of doing this step #0 is to write an internal report about the research you did. Again, write it more for yourself than for others8, explaining what you did and why, and what were your results. Write everything that you think may be relevant.
Then, try something like reverse outlining on that. Go from the jumbled set of sentences to something like a hierarchy of ideas (with maybe some unconnected ideas as well). See which of those ideas seem more important, interesting, and supported by your evidence or data. Probably that is a good point to start (see step #1). And anyways you will soon put this idea in front of your co-authors, so they can also help you weed out the really important ideas from the more superfluous ones.
A last disclaimer: the process I presented above looks linear and predictable, right? However, you may find that sometimes you need to backtrack several steps, if you or your co-authors see that a substantial change of direction is needed. Luckily, following this process also minimizes the possibility of drastic changes: you may have to rethink some section weights, move a few bullets around, change figures to match the new main idea… but probably you will not have to start all over again. And even if you had, throwing 3 pages of outline in the bin is much less painful than doing so with 15 pages of beautifully crafted prose!
Now is probably a good moment to wrap it up. Stop reading blog posts, and start writing. Believe me, with practice, a certain sense of ease will come. Heck, even enjoyment of writing a paper. I, for one, enjoy writing now – to the point that I started this blog to write some more, on top of my daily scientific writing! But I still remember the block, the fear of failure, of rejection. It all starts by saying “$%$&@# it” and writing something. Do a pomodoro. Do only one step of the process.
Do. It. Now.
If you have never used this kind of process for writing papers, why don’t you give it a try for your next paper? Then, let me know how it went in the comments below!
-
Pro tip: Extra points if you include also logical connectors to previous/next bullets (i.e., words like “however”, “on the other hand”, “besides”, etc.), if applicable. I find this really enhances the coherence and readability, not only of the outline itself, but also of the actual text that you will write later on around it. ↩︎
-
Of course, this is terribly unfair after you have spent so many hours perfecting every little detail of your manuscript. But these people do exist. And you may cross ways with them. So better be prepared, just in case that happens. And don’t even think that doing good, coherent text is not so important then, because in most good journals you get more often the “very detailed, I want to understand everything” kind of reviewer. You certainly have to write for those readers as well. The main underlying point: a paper needs to enable multiple kinds of reading in an effective way: the very fast, and the very detailed, and anything in between! ↩︎
-
You are using a reference manager. That was not a question. If you don’t use one yet, go and start using one right now (your first paper is actually a good moment to start building your reference library). Just do it. You can thank me later. The topic of what is the right reference manager can also span a whole separate post. Personally, I have found lately that Zotero fits quite well my needs and workflow (good integration with Word and Google Docs, good enough Bibtex support, etc.). But I have used different ones over the years, and your mileage may vary… ↩︎
-
Sometimes I apply these author guidelines and template as early as step #5. This has the advantage of helping you track length more accurately (if the target venue measures length in pages, not words). However, as we saw in my example paper, sometimes we change the target venue mid-way through the writing process. Thus, my advice would be to apply the template whenever you feel that the target venue is well-fixed and will likely not change until submission. ↩︎
-
See, for example, Stanford’s course “Writing in the Sciences”. Indeed, this is a very good course on scientific writing in general, if you want to dive a bit deeper in how to get good (or at least, competent) at writing your papers. ↩︎
-
Torrance, M., Thomas, G. V., & Robinson, E. J. (1994). The writing strategies of graduate research students in the social sciences. Higher Education, 27(3), 379–392. ↩︎
-
See, for example, this other paper writing method by Inger Mewburn (from The Thesis Whisperer, probably the most solid, long-standing blog about PhD issues). Her process looks a bit different (but not that much), and there are quite a few good pieces of advice there as well! ↩︎
-
If you’re anything like me, this is actually very useful. A few months after a research project or experiment, I barely remember what I did or what were the results, unless I have a good overview written down somewhere I can find it. ↩︎

Luis P. Prieto
Luis P. is a Ramón y Cajal research fellow at the University of Valladolid (Spain), investigating learning technologies, especially learning analytics. He is also an avid learner about doctoral education and supervision, and he's the main author at the A Happy PhD blog.